Upside-Down Cheesecake with Pineapple and Cherries Recipe
Introduction
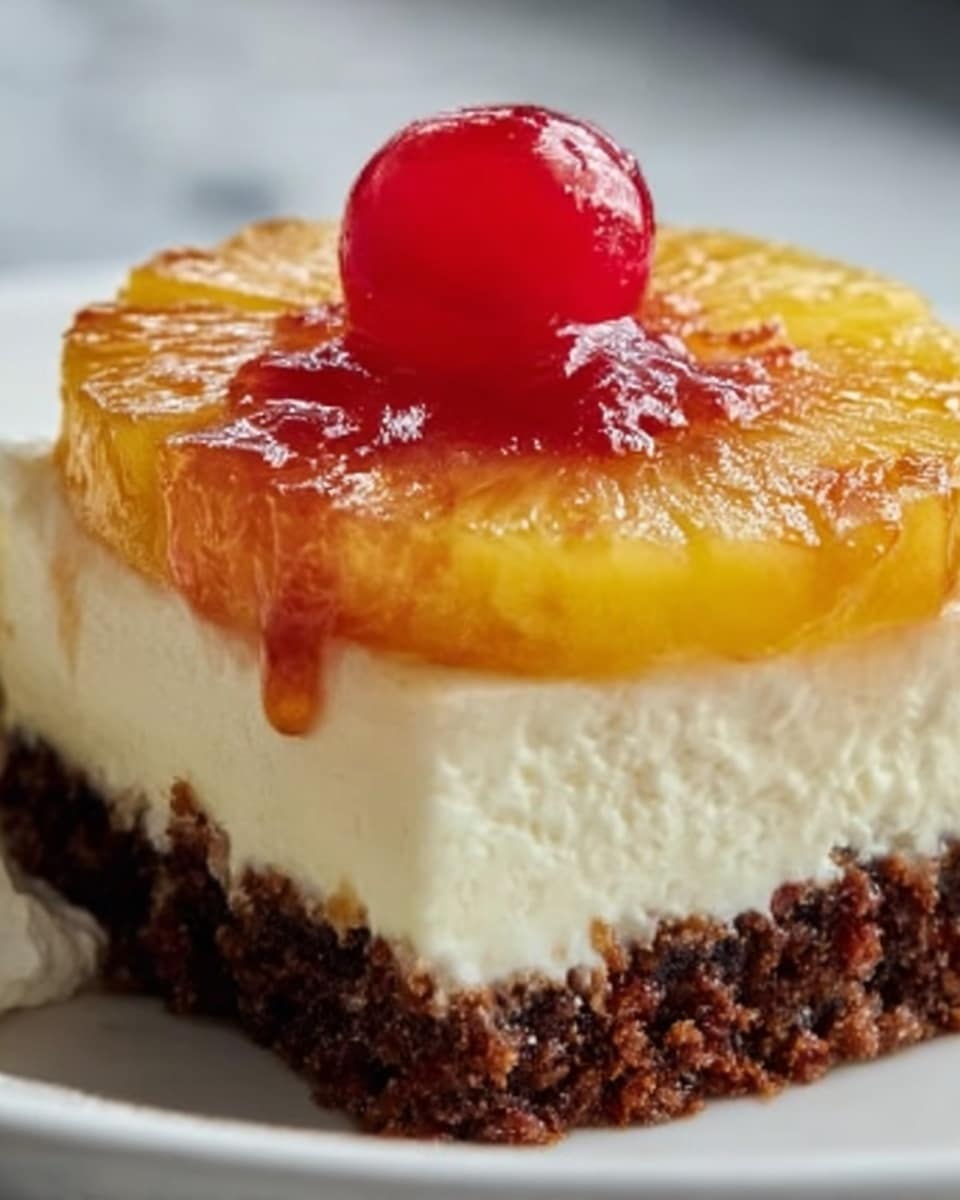
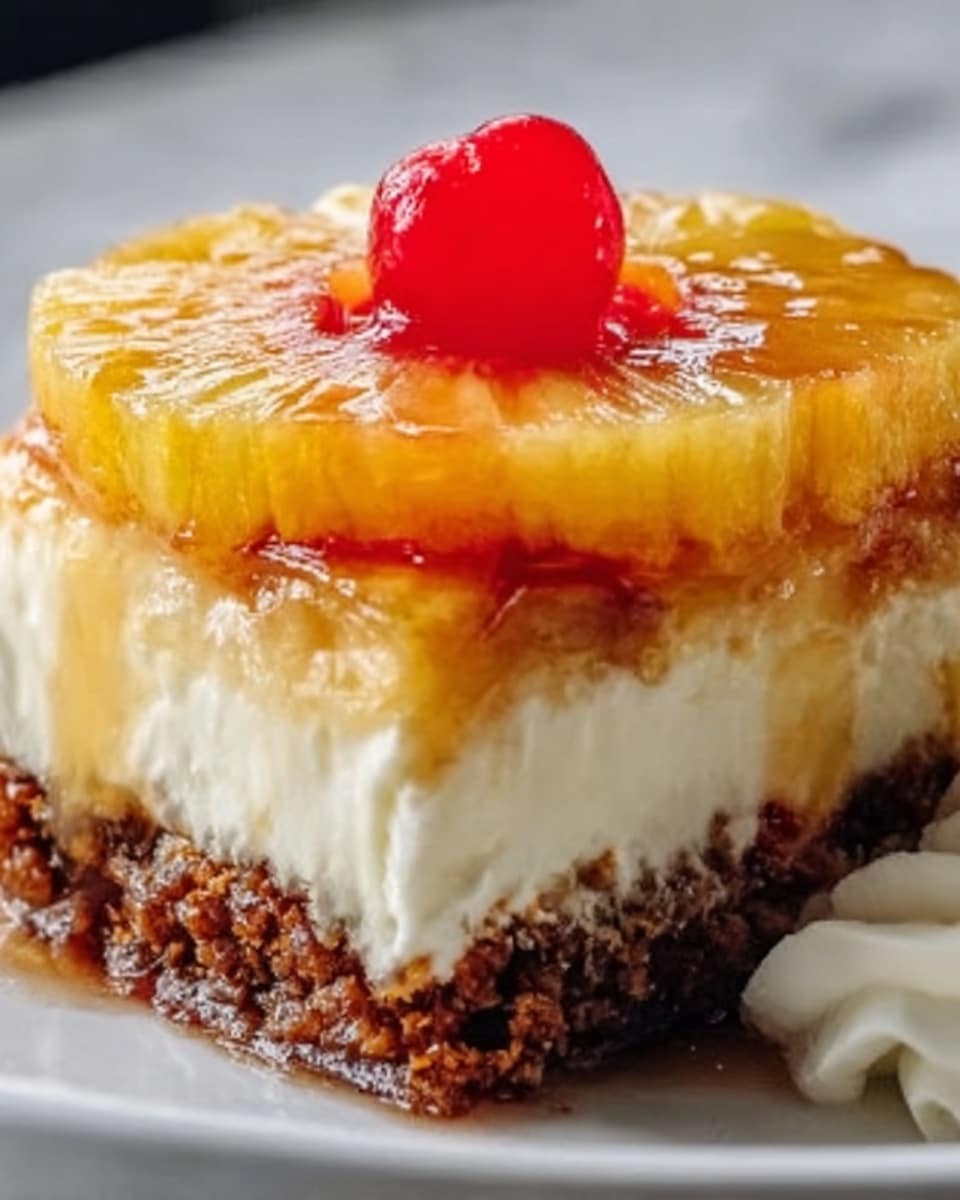
This upside-down cheesecake combines the rich creaminess of classic cheesecake with a sweet, fruity twist. Pineapple rings and maraschino cherries create a beautiful, caramelized topping that makes every slice a delightful treat.
Ingredients
- 1 1/2 cups graham cracker crumbs
- 1/4 cup unsalted butter, melted
- 1/2 cup brown sugar
- 6 to 8 pineapple rings, canned or fresh
- 6 to 8 maraschino cherries
- 24 ounces cream cheese, softened
- 3/4 cup granulated sugar
- 1/2 cup sour cream
- 1 teaspoon vanilla extract
- 3 large eggs
Instructions
- Step 1: Preheat the oven to 325°F. Grease a springform pan and sprinkle the brown sugar evenly on the bottom. Arrange the pineapple rings over the sugar and place a maraschino cherry in the center of each ring. Drizzle with the melted butter.
- Step 2: In a bowl, mix the graham cracker crumbs with the melted butter until combined. Press the mixture firmly over the pineapple layer. Place the pan in the freezer for 10 to 15 minutes to set.
- Step 3: In a large bowl, beat the cream cheese and granulated sugar together until smooth and creamy. Add the eggs one at a time, mixing slowly after each addition.
- Step 4: Stir in the sour cream and vanilla extract until the filling is fully combined and smooth.
- Step 5: Pour the cheesecake filling evenly over the graham cracker crust and pineapple layer. Smooth the top with a spatula.
- Step 6: Place the springform pan into a water bath by setting it inside a larger baking dish filled with hot water about halfway up the sides of the pan. Bake for 60 to 70 minutes, or until the center is mostly set but still slightly jiggly.
- Step 7: Turn off the oven and crack the door open. Let the cheesecake cool gradually inside the oven for 1 hour to prevent cracking.
- Step 8: Remove the cheesecake from the oven and refrigerate for at least 4 hours or overnight to fully chill and set.
- Step 9: Once chilled, run a knife around the edges of the pan to loosen the cheesecake. Release and remove the springform side. Carefully invert the cheesecake onto a serving plate so the pineapple and cherry topping are on top.
Tips & Variations
- Use fresh pineapple for a brighter flavor, or canned pineapple for convenience.
- For extra moisture, lightly brush the pineapple rings with pineapple juice before adding the graham cracker crust.
- Try using a mixture of brown sugar and maple syrup for a richer caramelized taste on the topping.
- If you prefer a firmer crust, bake the graham cracker layer for 5 minutes before adding the filling.
Storage
Store the cheesecake covered in the refrigerator for up to 4 days. Keep it tightly wrapped to prevent the cake from absorbing other fridge odors. When ready to serve, allow it to sit at room temperature for 15 to 20 minutes for the best texture. This cheesecake is not recommended for freezing, as the texture may suffer.
How to Serve
Serve this delicious recipe with your favorite sides.
FAQs
Can I use a regular cake pan instead of a springform pan?
While possible, a springform pan is recommended for easy removal and clean edges. If using a regular pan, line it with parchment paper and carefully invert the cheesecake, but this may be more challenging.
How do I prevent cracks on my cheesecake surface?
Gradual cooling is key. Cooling the cheesecake slowly in the oven with the door cracked helps prevent cracks. Also, avoid overbaking and be gentle when mixing ingredients to minimize air incorporation.
PrintUpside-Down Cheesecake with Pineapple and Cherries Recipe

This Upside-Down Cheesecake features a delightful combination of caramelized pineapple rings and maraschino cherries layered beneath a creamy, smooth cheesecake filling. With a sweet brown sugar base and a buttery graham cracker crust, this dessert is baked in a water bath to achieve a perfectly creamy texture. Chilling overnight ensures a firm, luscious finish that is both visually stunning and irresistibly delicious.
- Prep Time: 25 minutes
- Cook Time: 70 minutes
- Total Time: 6 hours 35 minutes
- Yield: 8 to 10 servings 1x
- Category: Dessert
- Method: Baking
- Cuisine: American
Ingredients
Base and Topping
- 1/2 cup brown sugar
- 6 to 8 pineapple rings, canned or fresh
- 6 to 8 maraschino cherries
- 1/4 cup unsalted butter, melted
- 1 1/2 cups graham cracker crumbs
- Additional 1/4 cup unsalted butter, melted (for crust)
Cheesecake Filling
- 24 ounces cream cheese, softened
- 3/4 cup granulated sugar
- 1/2 cup sour cream
- 1 teaspoon vanilla extract
- 3 large eggs
Instructions
- Prepare Pineapple Layer: Preheat the oven to 325°F (163°C). Grease a springform pan thoroughly. Evenly sprinkle the brown sugar onto the bottom of the pan. Arrange the pineapple rings over the sugar layer and place a maraschino cherry in the center of each pineapple ring. Drizzle with melted butter to enhance caramelization during baking.
- Make the Crust: In a bowl, combine graham cracker crumbs with the remaining melted butter until the mixture is evenly moistened. Press this crumb mixture evenly over the pineapple and brown sugar layer in the pan to form a firm crust. Place the pan in the freezer for 10 to 15 minutes to set the crust before adding the cheesecake filling.
- Beat Cream Cheese and Sugar: In a large mixing bowl, beat the softened cream cheese and granulated sugar together until smooth and creamy, free of lumps. This creates the base for the cheesecake filling.
- Add Eggs: Add the eggs one at a time to the cream cheese mixture, mixing slowly and gently after each addition to avoid incorporating too much air and to maintain a creamy texture.
- Incorporate Sour Cream and Vanilla: Mix in the sour cream and vanilla extract until the filling is fully combined and smooth, ensuring a rich and tangy cheesecake batter.
- Pour Filling and Bake: Pour the cheesecake filling carefully over the prepared crust and pineapple layer, smoothing the top evenly with a spatula. Place the springform pan in a water bath (bain-marie) to gently insulate it during baking. Bake in the preheated oven for 60 to 70 minutes or until the center is mostly set but retains a slight jiggle.
- Cool Gradually: Turn off the oven and crack the oven door open. Let the cheesecake cool gradually inside the oven for 1 hour to prevent cracking and to set the texture gradually.
- Chill: Remove the pan from the oven and refrigerate the cheesecake for at least 4 hours or preferably overnight, allowing it to fully firm up and develop its flavors.
- Unmold and Serve: Once fully chilled, run a thin knife around the edge of the cheesecake to loosen it from the pan. Release the springform pan carefully and invert the cheesecake onto a serving plate so the pineapple and cherry layer is on top, beautifully displaying the upside-down design.
Notes
- Using a water bath while baking helps prevent cracks and ensures a creamy texture.
- Chilling the cheesecake overnight is recommended for best slicing and flavor development.
- If fresh pineapple is used, blot excess moisture to avoid a soggy crust.
- Room temperature ingredients produce a smoother filling.
- Carefully freeze the crust before adding filling to maintain distinct layers.
- Ensure the pan is tightly wrapped in foil during the water bath to prevent water seepage.
Keywords: Upside-Down Cheesecake, Pineapple Cheesecake, Dessert, Baked Cheesecake, Springform Pan Dessert