Fruity Pebbles Cheesecake Tacos Recipe
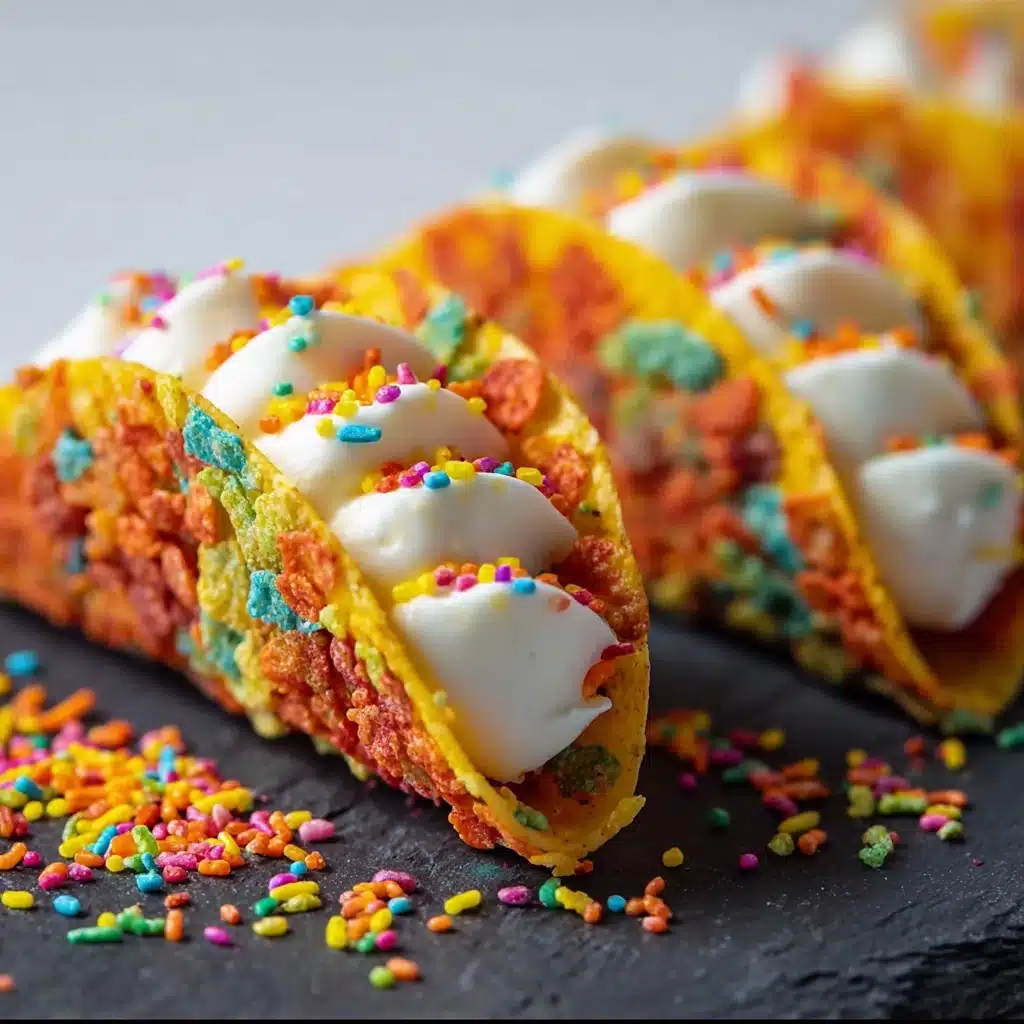
If you have a sweet tooth and love a playful twist on classic desserts, these Fruity Pebbles Cheesecake Tacos will become your new obsession. Imagine crunchy, colorful taco shells packed with a luscious, fluffy cheesecake filling, crowned with even more vibrant Fruity Pebbles cereal for that extra pop of fun and flavor. They’re easy to make, irresistibly delicious, and perfect for treating yourself or impressing guests with something truly unique. Once you try these Fruity Pebbles Cheesecake Tacos, you’ll wonder why no one thought of this genius combo before!
Ingredients You’ll Need
The magic of Fruity Pebbles Cheesecake Tacos lies in a few simple yet essential ingredients that combine to create incredible texture, flavor, and color. Each element plays a key role in turning everyday pantry items into a playful, show-stopping dessert you’ll love making again and again.
- Fruity cereal: The star ingredient that forms the crunchy, colorful taco shell and adds an eye-catching topping.
- Unsalted butter: Melted to bind the cereal together, ensuring those shells hold their shape perfectly.
- Cream cheese: The rich and creamy base of the cheesecake filling for that smooth, tangy bite.
- Powdered sugar: Adds the ideal amount of sweetness, blending seamlessly into the filling.
- Pure vanilla extract: A small splash that elevates the cheesecake flavor with warmth and depth.
- Whipped cream: Folded into the filling to lighten it up, giving the tacos an irresistible airy texture.
- Additional fruity cereal: For garnish, adding a bright, crunchy finish on top.
How to Make Fruity Pebbles Cheesecake Tacos
Step 1: Prepare the Crunchy Shell
Start by combining your fruity cereal with the melted unsalted butter in a mixing bowl. Stir really well to make sure every single piece gets coated evenly with butter—this helps the shell hold together and bake up crisp and delicious.
Step 2: Shape Your Shells
Take that buttery cereal mixture and firmly press it into small taco-shaped molds or muffin tins. The key here is to compact the mixture tightly so that your shells can hold their form after chilling. Once shaped, pop them in the refrigerator for at least 30 minutes to set.
Step 3: Whisk Up the Cheesecake Filling
While your shells are chilling, beat the softened cream cheese with a hand mixer until it’s light and fluffy—this is what creates that silky smooth cheesecake texture. Slowly add the sifted powdered sugar and vanilla extract, blending until everything is perfectly smooth.
Step 4: Add Airiness
Gently fold the whipped cream into your cream cheese mixture. Using a spatula, blend carefully to keep the filling light and airy—it’s this step that makes these Fruity Pebbles Cheesecake Tacos feel like a cloud of dessert magic with every bite.
Step 5: Assemble the Tacos
Once the shells have chilled and firmed up nicely, spoon the cheesecake filling generously into each one. Don’t be shy here—this filling is the creamy heart of your tacos and should be piled on high!
Step 6: Garnish and Serve
Finally, sprinkle additional fruity cereal over the filled tacos for an extra burst of color and crunch. Serve these right away or chill them a little longer if you prefer a firmer texture on the filling.
How to Serve Fruity Pebbles Cheesecake Tacos

Garnishes
A light dusting of powdered sugar, or even a drizzle of white chocolate sauce, can turn your Fruity Pebbles Cheesecake Tacos into a dazzling treat. Adding fresh berries or edible flowers elevates both presentation and flavor, making them pop at any gathering.
Side Dishes
These tacos are a dessert star on their own but pairing them with simple vanilla ice cream or a scoop of tangy sorbet can perfectly complement the creamy and crunchy textures. For a party, serve alongside fruit kebabs for a playful mix of sweet and fresh.
Creative Ways to Present
Try setting these colorful tacos in a taco holder or lining them up on a bright platter for a fun fiesta vibe. You can also serve them in individual mini dessert plates with spoons, making it easy for guests to enjoy without worry about mess.
Make Ahead and Storage
Storing Leftovers
Keep any unused Fruity Pebbles Cheesecake Tacos in an airtight container in the refrigerator. They stay fresh for up to 3 days, but be mindful that the cereal shells may soften a little over time due to the moisture from the filling.
Freezing
If you want to prepare these in advance, you can freeze the cheesecake filling separately in a sealed container for up to 1 month. Assemble with fresh shells when you’re ready to serve for the best texture and taste experience.
Reheating
Since these tacos are best enjoyed chilled, reheating is not recommended. Instead, let frozen filling thaw in the fridge overnight before assembling with fresh cereal shells for optimal flavor and texture.
FAQs
Can I use a different cereal instead of Fruity Pebbles?
Absolutely! While Fruity Pebbles give these cheesecake tacos their iconic color and fruity flavor, you can experiment with other cereals like Rice Krispies or Cap’n Crunch for a different crunch and taste.
How do I make sure the taco shells don’t break?
Press the cereal mixture firmly and evenly into your molds and chill long enough for the shells to firm up. Handle them gently when removing from molds to keep them intact.
Can I make the cheesecake filling dairy-free?
You can substitute dairy-free cream cheese and whipped topping alternatives, but be mindful that the texture might vary slightly. It’s best to use products designed for baking to maintain the light, fluffy filling.
What’s the best way to soften cream cheese quickly?
Leave the cream cheese out at room temperature for about 30 minutes, or microwave it in short 10-second bursts, checking often, until soft but not melted.
Can these Fruity Pebbles Cheesecake Tacos be made for a crowd?
Definitely! The recipe scales up easily. Consider making in batches and setting up an assembly station so everyone can enjoy the fun of filling and garnishing their own tacos.
Final Thoughts
These Fruity Pebbles Cheesecake Tacos are pure joy in dessert form — bright, crunchy, creamy, and undeniably fun. Whether you’re making them for a special occasion or just because life calls for a celebration, they’re guaranteed to bring big smiles and happy taste buds to the table. Give this playful recipe a try and watch how quickly they disappear from the plate!
PrintFruity Pebbles Cheesecake Tacos Recipe

Fruity Pebbles Cheesecake Tacos combine a crunchy fruity cereal shell with a smooth, fluffy cheesecake filling for a playful and delicious dessert that’s easy to make and visually appealing.
- Prep Time: 15 minutes
- Cook Time: 0 minutes (no baking required)
- Total Time: 45 minutes (including chilling time)
- Yield: 6–8 cheesecake tacos 1x
- Category: Dessert
- Method: No Bake, Chilling
- Cuisine: American
- Diet: Vegetarian
Ingredients
For the Crunchy Shell
- 3 cups Fruity Pebbles cereal
- 1/2 cup unsalted butter, melted
For the Cheesecake Filling
- 8 oz cream cheese, softened to room temperature
- 1/2 cup powdered sugar, sifted
- 1 tsp pure vanilla extract
- 1 cup whipped cream
For Garnish
- Additional Fruity Pebbles cereal
Instructions
- Prepare the Crunchy Shell: In a mixing bowl, combine 3 cups of Fruity Pebbles cereal with 1/2 cup melted unsalted butter. Stir thoroughly to ensure every piece is evenly coated with butter, which will help the mixture hold together.
- Shape Your Shells: Press the cereal mixture firmly into small taco-shaped molds or muffin tins. Make sure to compact the mixture tightly so it forms a sturdy shell. Place the shaped shells in the refrigerator to chill for at least 30 minutes, which helps them set properly.
- Whisk Up the Cheesecake Filling: Using a hand mixer, beat 8 oz of softened cream cheese until it becomes light and fluffy. Gradually add 1/2 cup sifted powdered sugar and 1 teaspoon pure vanilla extract, continuing to blend until the mixture is smooth and creamy.
- Add Airiness: Gently fold 1 cup of whipped cream into the cream cheese mixture using a spatula. Carefully incorporate the whipped cream to maintain a light, airy texture without deflating the mixture.
- Assemble the Tacos: Once the cereal shells are firm, spoon a generous amount of the cheesecake filling into each shell, filling them nicely without overstuffing.
- Garnish and Serve: Sprinkle additional Fruity Pebbles cereal over the filled shells for extra crunch and color. Serve immediately for a soft shell texture, or chill for a firmer texture before serving.
Notes
- Make sure the cream cheese is fully softened at room temperature for the smoothest filling.
- Press the cereal mixture firmly into the molds to prevent the shells from crumbling when filled.
- For a firmer shell and filling, refrigerate the assembled tacos for an additional 30 minutes before serving.
- This recipe is best enjoyed fresh but can be stored in the fridge for up to 2 days.
- To make the whipped cream from scratch, beat heavy cream with a little sugar until stiff peaks form.
Nutrition
- Serving Size: 1 taco
- Calories: 250
- Sugar: 18g
- Sodium: 150mg
- Fat: 15g
- Saturated Fat: 9g
- Unsaturated Fat: 5g
- Trans Fat: 0g
- Carbohydrates: 25g
- Fiber: 0.5g
- Protein: 3g
- Cholesterol: 40mg
Keywords: Fruity Pebbles, cheesecake tacos, no bake dessert, fruity cereal dessert, easy fun dessert, kid-friendly dessert