Frosted Christmas Brownies Recipe
If you’re looking to bring some festive magic to your holiday dessert table, these Frosted Christmas Brownies are an absolute must-try. Rich, fudgy brownies become the perfect canvas for vibrant, luscious frosting in classic holiday colors, topped with shimmering edible stars and delicate pearl sprinkles. Whether you’re a seasoned baker or a holiday enthusiast wanting a quick yet dazzling treat, this recipe blends simple ingredients with creative decorating for a sweet centerpiece that captures the joy of the season in every bite.

Ingredients You’ll Need
The beauty of Frosted Christmas Brownies lies in their simplicity—just a handful of basic ingredients combine to create an irresistibly moist and colorful treat. Each element plays a crucial role, from the fudgy texture of the brownies to the smooth, vibrant frosting that brings the festive spirit to life.
- 2 Boxes of Brownie Mix (or homemade brownie batter): Choose your favorite brand or prepare a double batch of your own for a rich, chewy base.
- White Frosting (1-3 jars): This creamy frosting is essential for adding sweetness and the perfect canvas for holiday colors.
- Edible Gel Food Coloring: For bright red and green hues without artificial dyes—perfect for a natural, festive touch.
- Edible Gold Stars: Tiny shimmering stars add a magical sparkle to your decorated brownies.
- White Pearl Sprinkles: These elegant beads bring texture and a snowy effect to the frosting.
- Icing Bags: To pipe your frosting smoothly and neatly for detailed decorations.
- Frosting Tips (large star – 1M): Ideal for creating those beautiful swirled patterns and festive textures on your brownies.
How to Make Frosted Christmas Brownies
Step 1: Prepare and Bake the Brownies
Start by preheating your oven according to the brownie mix box instructions—this ensures even baking from the start. Lightly spray a 9-inch springform pan with cooking spray to keep the brownies from sticking. Mix both boxes of brownie mix (or prepare a double batch of your homemade batter) thoroughly, then pour the batter into the pan, smoothing it out evenly.
Step 2: Baking to Perfection
Bake the brownies as directed on the packaging, or until a toothpick inserted in the center comes out clean. This guarantees your brownies are moist yet fully cooked. Once baked, allow them to cool completely—patience here means your frosting won’t melt and slide off later!
Step 3: Cutting and Preparing for Decoration
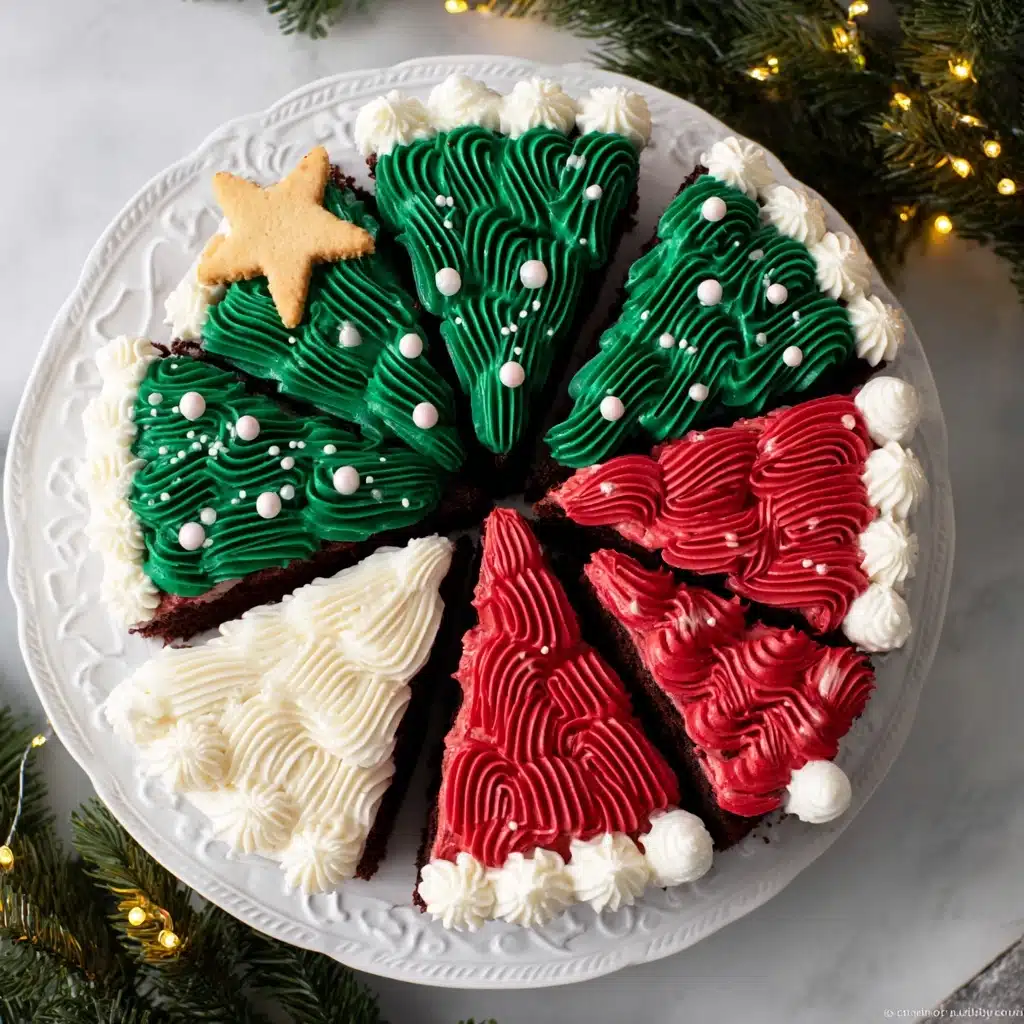
Once cooled, carefully remove the brownie slab from the pan and place it on a cutting board. Cut it into 8 triangles, mimicking the shape of holiday trees and hats to guide your festive decorating ideas.
Step 4: Coloring the Frosting
In two separate small bowls, add red gel food coloring to some white frosting in one, and green gel food coloring to the other. Mix well until you get vibrant, uniform colors. Leave some frosting plain white to balance out your design. This color trio will make your Frosted Christmas Brownies truly pop with holiday cheer.
Step 5: Decorating Your Frosted Christmas Brownies
Fill three icing bags, each with a different frosting color and fitted with your favorite frosting tip (large star tip #1M recommended). Use the green frosting to create tree shapes, the red and white frosting for Santa Claus hat designs, and pipe intricate swirls, stars, or snow-like dots. Garnish with white pearl sprinkles and edible gold stars to add a dazzling finishing touch.
How to Serve Frosted Christmas Brownies
Garnishes
Fresh garnishes can elevate your already delightful Frosted Christmas Brownies. The edible gold stars catch the light beautifully, while white pearl sprinkles give a snowy effect that feels both elegant and festive. Play around with these details to impress your guests visually and delight their taste buds.
Side Dishes
Serve your brownies alongside a warm cup of spiced hot cocoa or a glass of creamy eggnog for a full holiday experience. Fresh berries or a simple scoop of vanilla ice cream complement the rich chocolate and festive frosting flavors perfectly without overpowering them.
Creative Ways to Present
For a memorable holiday display, arrange your Frosted Christmas Brownies on a rustic wooden board or a festive holiday-themed platter. Stack them in layers or create a brownie “tree” centerpiece. Wrapping individual brownies in clear treat bags tied with a ribbon also makes charming edible gifts for friends and family.
Make Ahead and Storage
Storing Leftovers
If you have any Frosted Christmas Brownies left (which is rare!), store them in an airtight container at room temperature. They’ll stay fresh and moist for up to 3 days. The frosting maintains its creamy texture beautifully, so you can enjoy them later without loss of flavor or flair.
Freezing
Wrap each frosted brownie individually in plastic wrap and place them in a freezer-safe container or bag. When frozen this way, they keep well for up to one month. Defrost them at room temperature to preserve the soft, luscious texture of both brownie and frosting when you’re ready to indulge again.
Reheating
For a freshly-baked feel, warm brownies briefly in a microwave for about 10-15 seconds—just enough to soften the chocolate but not melt the frosting too much. This quick heat-up enhances the gooey texture and makes the festive frosting even more irresistible.
FAQs
Can I use a gluten-free brownie mix for Frosted Christmas Brownies?
Absolutely! A gluten-free brownie mix works well and can be swapped in directly. Just be sure to follow the baking instructions on your specific mix for the best results.
Can I make the frosting from scratch?
Yes, homemade frosting is a wonderful choice if you prefer to avoid store-bought. A simple buttercream made with butter, powdered sugar, vanilla, and a splash of milk can be whipped up quickly and colored with gel food coloring just like the store-bought version.
How far in advance can I decorate the brownies?
You can bake and frost your brownies a day ahead and store them covered at room temperature. This makes them even better as flavors meld, just be careful not to refrigerate as it can dry them out.
Do I have to use edible gold stars and pearl sprinkles?
Not at all—these are fun decorative options that add sparkle and texture, but you can get creative with other toppings like crushed candy canes, colored sugar, or nuts if you prefer different textures and flavors.
What if I don’t have a springform pan?
No worries! You can bake the brownies in a regular 9×9 inch square pan. Once cooled, cut the brownies into festive shapes with a sharp knife or cookie cutters before frosting.
Final Thoughts
I can’t recommend these Frosted Christmas Brownies enough for your holiday celebrations. They are not just delicious; they bring that extra sparkle and warmth that everyone looks for during the season. Give them a try and watch how quickly they disappear from the dessert plate—these beauties truly capture the joy of Christmas in every festive bite!
PrintFrosted Christmas Brownies Recipe
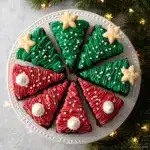
Celebrate the festive season with these delightful Frosted Christmas Brownies. Soft, rich brownies are cut into triangle shapes and decorated to resemble Christmas trees and Santa hats using vibrant red, green, and white frostings along with edible gold stars and pearl sprinkles. Perfect for holiday parties, family gatherings, or as a homemade holiday gift.
- Prep Time: 15 minutes
- Cook Time: 30 minutes
- Total Time: 45 minutes
- Yield: 8 decorated brownies 1x
- Category: Dessert
- Method: Baking and decorating
- Cuisine: American
- Diet: Vegetarian
Ingredients
Brownies
- 2 Boxes of Brownie Mix (or a double batch of homemade brownie batter)
- Non-stick spray oil for greasing pan
Frosting and Decoration
- 1 to 3 jars of white frosting (amount depending on decoration amount)
- Edible gel food coloring (red and green; alternative: natural no artificial dye food coloring)
- Edible gold star sprinkles
- White pearl sprinkles
Tools
- Icing bags
- Large star frosting tip (size 1M)
Instructions
- Preheat and Prepare Pan: Preheat your oven according to the instructions on your brownie mix box. Spray a 9-inch springform pan lightly with non-stick oil to ensure easy removal of the brownies after baking.
- Mix and Bake Brownies: Mix both boxes of brownie mix together according to package directions (or prepare a double batch of homemade brownie batter). Pour the batter evenly into the prepared springform pan. Bake as directed on the package, or until a toothpick inserted into the center comes out clean, indicating the brownies are fully cooked. Allow the brownies to cool completely in the pan.
- Remove and Cut Brownies: Once cooled, carefully remove the brownies from the springform pan and place on a cutting board. Cut the brownies into 8 triangle-shaped pieces to mimic Christmas tree slices.
- Prepare Colored Frostings: In separate small bowls, mix white frosting with red gel food coloring in one bowl and white frosting with green gel food coloring in another. Leave a portion of white frosting plain. Adjust the amount of gel coloring until your desired shades of red and green are achieved.
- Fill Icing Bags: Transfer the red, green, and white frostings into individual icing bags fitted with your favorite frosting tips, preferably a large star tip like 1M for decorative piping.
- Decorate Brownies: Use the green frosting to pipe the Christmas tree design on the triangle brownies, then embellish with white pearl sprinkles and edible gold stars as ornaments and tree toppers. Decorate the Santa hat brownies using a combination of red and white frostings to create Santa’s hat shape and trim.
- Serve and Enjoy: Arrange the decorated brownies on a festive platter and serve to your guests for a charming holiday treat. Enjoy the rich, chocolaty base paired with creamy, colorful frosting and sprinkles!
Notes
- If using homemade brownies, use your favorite recipe and ensure the batter quantity matches a double batch to fill a 9-inch pan adequately.
- Allow brownies to cool completely before frosting to prevent melting and smearing.
- For a natural alternative to gel food coloring, consider using beet juice for red and spinach powder for green.
- The amount of frosting may vary depending on how extensively you decorate the brownies; start with 1 jar and add more as needed.
- Use parchment paper under the brownies when cutting to keep your cutting board clean and facilitate easier handling.
- These brownies can be stored in an airtight container at room temperature for up to 3 days or refrigerated for up to a week.
Nutrition
- Serving Size: 1 brownie (approx. 1/8 of recipe)
- Calories: 350 kcal
- Sugar: 28 g
- Sodium: 210 mg
- Fat: 18 g
- Saturated Fat: 7 g
- Unsaturated Fat: 8 g
- Trans Fat: 0.2 g
- Carbohydrates: 45 g
- Fiber: 2 g
- Protein: 3 g
- Cholesterol: 30 mg
Keywords: Christmas brownies, holiday desserts, frosted brownies, festive treats, Christmas tree brownie, Santa hat brownie, holiday baking