Coffee Cheesecake Recipe
Introduction
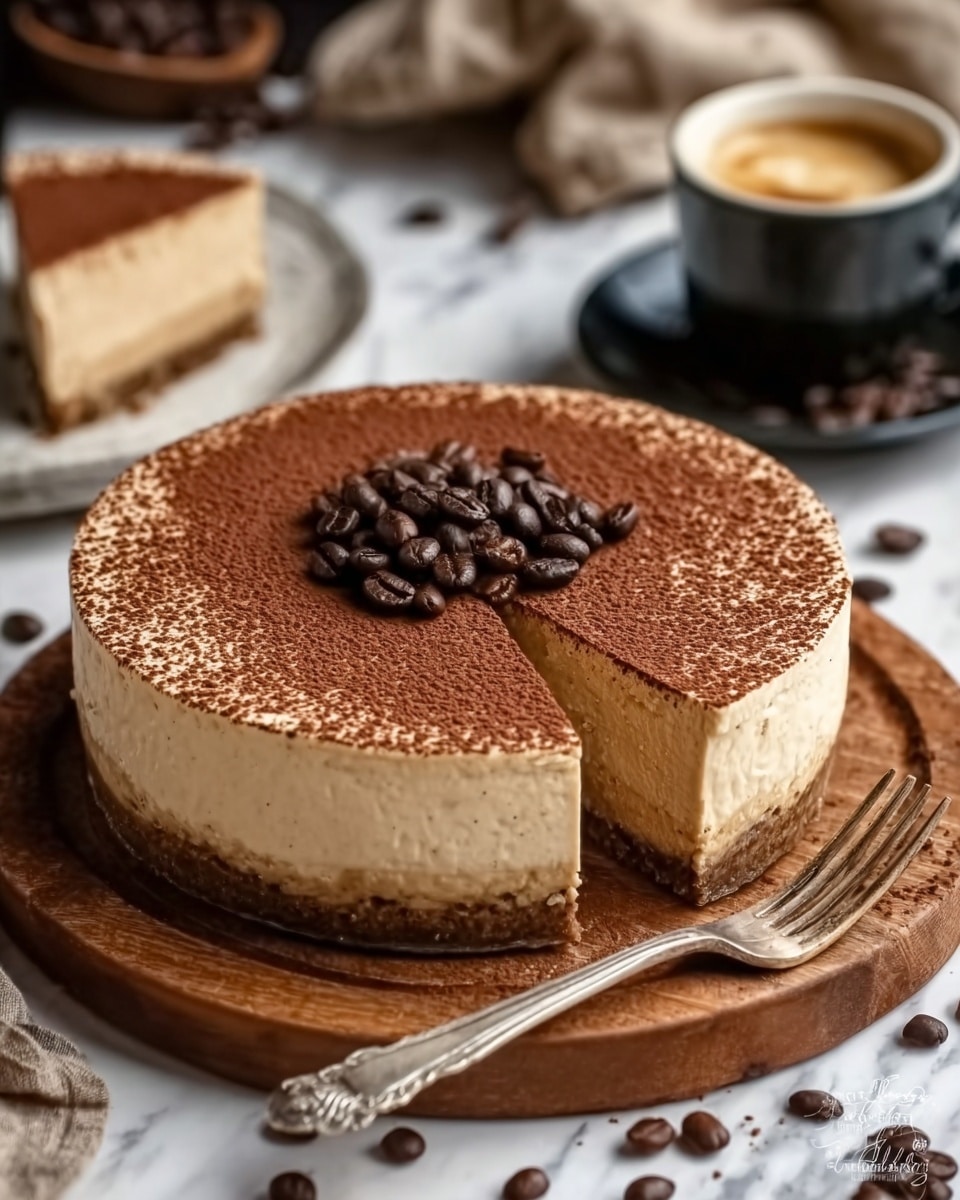
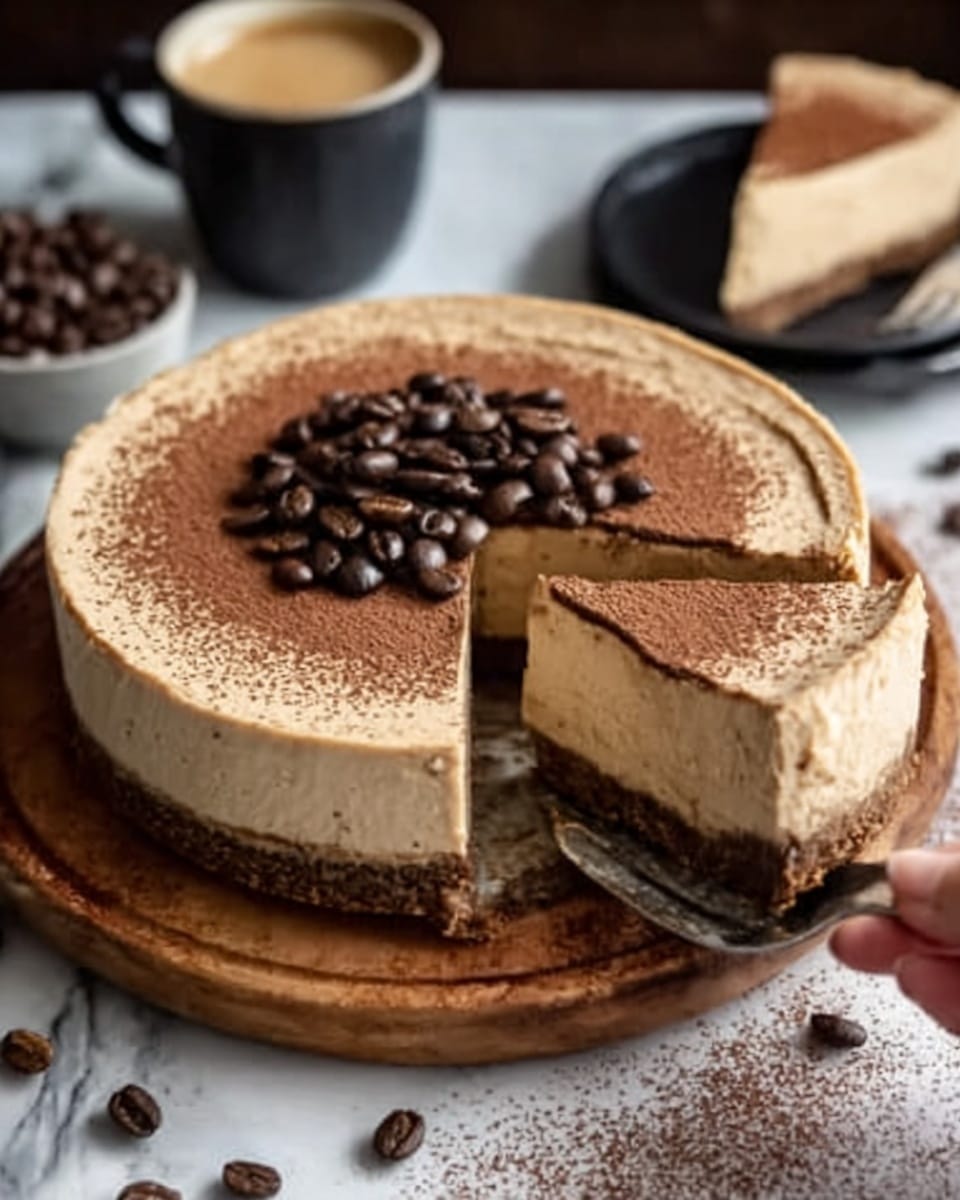
This coffee cheesecake combines rich cream cheese with bold espresso flavor, creating a decadent dessert perfect for coffee lovers. With a chocolate cookie crust and creamy coffee-infused filling, it’s a delightful treat that’s sure to impress.
Ingredients
- 1 1/2 cups crushed chocolate sandwich cookies (like Oreos)
- 1/4 cup unsalted butter, melted
- 24 oz (3 blocks) cream cheese, softened
- 3/4 cup granulated sugar
- 2 tablespoons cornstarch
- 3 large eggs
- 1/2 cup sour cream
- 1/2 cup heavy cream
- 2 tablespoons instant espresso powder (or very strong brewed coffee)
- 1 teaspoon vanilla extract
- 1 cup heavy whipping cream
- 2 tablespoons powdered sugar
- 1 teaspoon instant espresso powder
- Chocolate shavings, for garnish
- Cocoa powder, for dusting
- Coffee beans, for decoration
Instructions
- Step 1: Preheat your oven to 325°F (163°C). Grease a 9-inch springform pan and line the bottom with parchment paper.
- Step 2: In a bowl, mix the crushed chocolate cookies and melted butter until well combined.
- Step 3: Press the mixture firmly into the bottom of the springform pan, using the back of a spoon or a flat measuring cup.
- Step 4: Bake the crust for 10 minutes, then remove from the oven and let it cool while you prepare the filling.
- Step 5: In a large mixing bowl, beat the cream cheese, sugar, and cornstarch until smooth and creamy, about 2 minutes.
- Step 6: Add the eggs one at a time, mixing on low speed after each addition to avoid incorporating too much air.
- Step 7: In a separate small bowl, whisk together the heavy cream, sour cream, espresso powder, and vanilla extract until smooth.
- Step 8: Gradually mix the coffee-cream mixture into the cheesecake batter, ensuring everything is well combined but not over-mixed.
- Step 9: Pour the batter over the cooled crust, smoothing the top with a spatula.
- Step 10: Wrap the outside of the springform pan with two layers of aluminum foil to prevent leaks (for water bath).
- Step 11: Place the pan inside a larger baking dish and fill it with 1 inch of hot water to create a gentle, even bake.
- Step 12: Bake at 325°F (163°C) for 50-55 minutes, until edges are set but center still has a slight jiggle.
- Step 13: Turn off the oven and leave the cheesecake inside with the door slightly open for 1 hour to cool gradually.
- Step 14: Remove from the oven and let the cheesecake cool at room temperature for 30 minutes.
- Step 15: Transfer to the refrigerator and chill for at least 6 hours or overnight for best texture and flavor.
- Step 16: In a mixing bowl, beat heavy whipping cream, powdered sugar, and espresso powder until stiff peaks form.
- Step 17: Pipe or spread the whipped cream over the chilled cheesecake before serving.
- Step 18: Dust the cheesecake with cocoa powder, sprinkle with chocolate shavings, and decorate with coffee beans.
- Step 19: Slice and serve with a hot cup of coffee or espresso for the ultimate coffee-lover’s dessert.
Tips & Variations
- Use very strong brewed coffee instead of espresso powder for a milder coffee flavor.
- Wrap the springform pan tightly with foil to avoid water leaks during the water bath bake.
- For a smoother texture, beat cream cheese until completely lump-free before adding other ingredients.
- Try adding a pinch of cinnamon or nutmeg to the filling for a warm spice twist.
- Replace sour cream with Greek yogurt for a slightly tangier cheesecake.
Storage
Store the cheesecake in an airtight container in the refrigerator for up to 4 days. For longer storage, freeze the cheesecake (without whipped cream topping) wrapped tightly in plastic wrap and foil for up to 1 month. Thaw in the refrigerator overnight before serving. Reapply fresh whipped cream before serving if desired.
How to Serve
Serve this delicious recipe with your favorite sides.
FAQs
Can I use regular coffee instead of instant espresso powder?
Yes, you can substitute very strong brewed coffee for the espresso powder, but the flavor may be less intense. Adjust the amount based on your taste preference.
How do I prevent cracks in my cheesecake?
Adding cornstarch helps prevent cracks. Also, avoid over-mixing the batter and use the water bath method to ensure gentle, even baking. Cooling the cheesecake gradually in the oven with the door slightly open helps minimize cracks as well.
PrintCoffee Cheesecake Recipe

This rich and creamy Coffee Cheesecake features a chocolate cookie crust and a smooth coffee-infused filling. Topped with espresso whipped cream, cocoa powder, chocolate shavings, and coffee beans, it’s a perfect dessert for coffee lovers seeking a decadent treat.
- Prep Time: 20 minutes
- Cook Time: 1 hour 5 minutes
- Total Time: 7 hours 25 minutes
- Yield: 12 servings 1x
- Category: Dessert
- Method: Baking
- Cuisine: American
Ingredients
Crust
- 1 1/2 cups crushed chocolate sandwich cookies (like Oreos)
- 1/4 cup unsalted butter, melted
Filling
- 24 oz (3 blocks) cream cheese, softened
- 3/4 cup granulated sugar
- 2 tablespoons cornstarch (helps prevent cracks)
- 3 large eggs
- 1/2 cup sour cream
- 1/2 cup heavy cream
- 2 tablespoons instant espresso powder (or very strong brewed coffee)
- 1 teaspoon vanilla extract
Topping
- 1 cup heavy whipping cream
- 2 tablespoons powdered sugar
- 1 teaspoon instant espresso powder
- Chocolate shavings
- Cocoa powder dusting
- Coffee beans
Instructions
- Preheat and Prepare Pan: Preheat your oven to 325°F (163°C). Grease a 9-inch springform pan and line the bottom with parchment paper to prevent sticking.
- Make Crust Mixture: In a bowl, combine the crushed chocolate sandwich cookies and melted unsalted butter until well mixed.
- Press Crust: Firmly press the cookie and butter mixture into the bottom of the springform pan using the back of a spoon or a flat measuring cup to create an even layer.
- Bake Crust: Bake the crust in the preheated oven for 10 minutes, then remove and allow it to cool while preparing the filling.
- Beat Cream Cheese Mixture: In a large mixing bowl, beat the softened cream cheese, granulated sugar, and cornstarch until smooth and creamy, about 2 minutes, ensuring no lumps remain.
- Add Eggs: Add the eggs one at a time, mixing on low speed after each addition to avoid incorporating excess air which can cause cracks.
- Prepare Coffee Mixture: In a separate small bowl, whisk together heavy cream, sour cream, instant espresso powder, and vanilla extract until the mixture is smooth.
- Combine Mixtures: Gradually add the coffee-cream mixture into the cream cheese batter, mixing gently to combine without overmixing.
- Pour Batter: Pour the combined filling over the cooled crust in the springform pan and smooth the top evenly with a spatula.
- Prepare Water Bath: Wrap the outside of the springform pan with two layers of aluminum foil to prevent water from leaking into the cheesecake.
- Set Up Water Bath: Place the wrapped pan inside a larger baking dish and pour in about 1 inch of hot water to create a gentle, even baking environment.
- Bake Cheesecake: Bake at 325°F (163°C) for 50-55 minutes or until the edges are set but the center still has a slight jiggle when gently shaken.
- Cool Gradually: Turn off the oven, crack the oven door open slightly, and leave the cheesecake inside for 1 hour to cool gradually and reduce cracking.
- Room Temperature Cooling: Remove the cheesecake from the oven and let it cool on the counter for an additional 30 minutes.
- Refrigerate: Transfer the cheesecake to the refrigerator and chill for at least 6 hours or overnight to set completely and develop flavor.
- Prepare Topping: In a mixing bowl, beat the heavy whipping cream, powdered sugar, and espresso powder until stiff peaks form for the coffee whipped cream topping.
- Decorate: Pipe or spread the espresso whipped cream over the chilled cheesecake surface evenly.
- Garnish: Dust the top of the cheesecake with cocoa powder, sprinkle with chocolate shavings, and decorate with whole coffee beans for an elegant finish.
- Serve: Slice the cheesecake and serve it alongside a hot cup of coffee or espresso for the ultimate coffee-lover’s dessert experience.
Notes
- Using a water bath helps prevent cracks by providing gentle, even heat and moisture.
- Allowing the cheesecake to cool gradually in the oven prevents temperature shock, which can cause cracks.
- Chilling overnight enhances texture and flavor, making the cheesecake firm and creamy.
- Instant espresso powder can be substituted with very strong brewed coffee, but reduce liquid to maintain batter consistency.
- Be careful not to overmix the batter to keep the cheesecake dense and creamy without air bubbles.
- The chocolate cookie crust adds a complementary texture and flavor pairing with the coffee filling.
Keywords: coffee cheesecake, espresso cheesecake, chocolate crust cheesecake, coffee dessert, creamy cheesecake