Cream Filled Pizzelles Recipe
Introduction
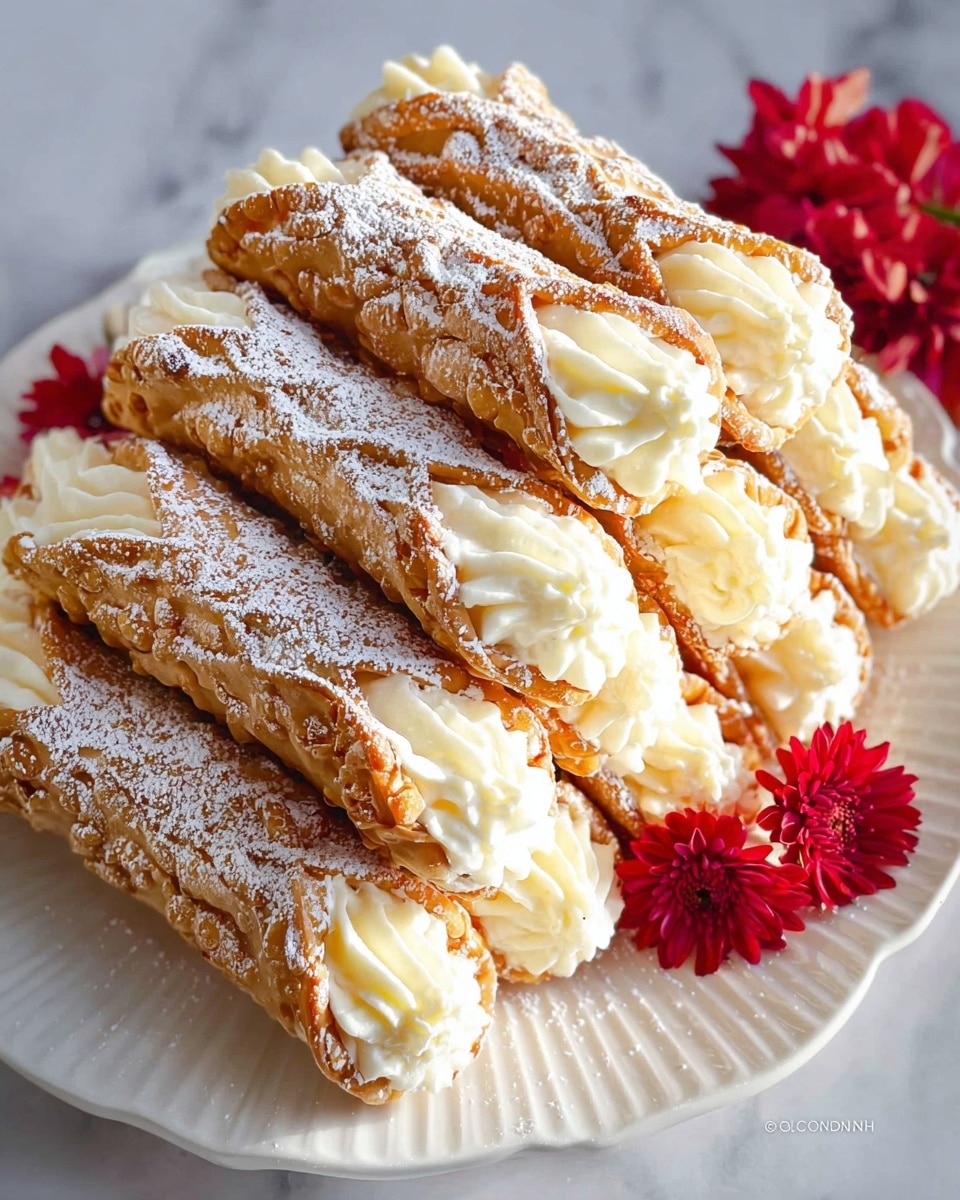
Cream Filled Pizzelles are delicate Italian waffle cookies shaped into crisp cylinders and filled with a luscious, creamy filling. This recipe combines the light, crisp texture of pizzelles with a smooth, sweet cream cheese filling for a delightful treat perfect for any occasion.

Ingredients
- 4 large eggs – room temperature
- 1/4 cup granulated sugar
- 1/4 teaspoon fine salt
- 2 tablespoons grapeseed oil (vegetable oil is okay; use melted cooled butter for crispier results)
- 1/2 teaspoon vanilla extract
- 1 cup all-purpose flour – sifted
- 8 oz cream cheese – refrigerated
- 1/3 cup sweetened condensed milk – refrigerated
- 8 oz Cool Whip – frozen (preferably extra creamy, not original)
- 1/4 teaspoon vanilla extract
- 1 tablespoon powdered sugar (for dusting – optional)
Instructions
- Step 1: Preheat the pizzelle maker while preparing the batter. In a medium bowl, beat the eggs, granulated sugar, and salt on high speed with an electric mixer until the mixture lightens in color and the sugar dissolves, about 2 minutes.
- Step 2: Add the grapeseed oil, vanilla extract, and sifted flour to the egg mixture. Mix on low speed until the flour is fully incorporated, about 1 minute.
- Step 3: Using a tablespoon, spoon batter onto each pizzelle pattern on the maker. Close the lid and bake for 18-20 seconds or until the pizzelles are a dark golden color. Carefully remove each pizzelle with a disposable fork and quickly wrap it around the wooden stick that comes with the maker to form a cylinder. Work fast before the pizzelles cool and become brittle. Place the formed pizzelles in a single layer on a baking sheet to cool and dry. Avoid stacking to prevent sogginess.
- Step 4: For the filling, beat the cream cheese in a medium bowl on high speed for about 1 minute until smooth. Add the sweetened condensed milk and vanilla extract, then beat for another minute. Fold in the frozen Cool Whip and continue beating on high until the filling is thick and smooth, about 2-3 minutes.
- Step 5: Fill a piping bag with the cream filling. Pipe the filling into both ends of each pizzelle cylinder. Dust the filled pizzelles lightly with powdered sugar if desired. Refrigerate until ready to serve.
Tips & Variations
- For crispier pizzelles, substitute the oil with melted and cooled butter.
- If you don’t have a pizzelle maker, use a thin waffle iron but the shape will be different.
- Try adding citrus zest (lemon or orange) to the batter for a fresh twist.
- Use homemade whipped cream instead of Cool Whip for a more natural filling.
Storage
Store the filled pizzelles in an airtight container in the refrigerator for up to 3 days. For best texture, keep the pizzelles and filling separate until just before serving to prevent sogginess. Reheat unfilled pizzelles briefly in a low oven if needed to restore crispness.
How to Serve
Serve this delicious recipe with your favorite sides.
FAQs
Can I make pizzelles ahead of time?
Yes, you can bake pizzelles ahead and store them in an airtight container at room temperature for up to 2 days. Shape them around the stick while still warm, then fill just before serving.
What can I use if I don’t have a piping bag?
You can fill a zip-top plastic bag with the cream filling and cut a small corner off to pipe the cream into the pizzelles.
PrintCream Filled Pizzelles Recipe

Delightful Italian-inspired cream filled pizzelles featuring crisp, golden waffle cookies shaped into cylinders and filled with a luscious, smooth cream cheese and whipped topping filling. These elegant, bite-sized treats are perfect for special occasions, afternoon tea, or festive gatherings, combining light texture with rich sweetness for a memorable dessert experience.
- Prep Time: 15 minutes
- Cook Time: 20 minutes
- Total Time: 35 minutes
- Yield: About 20 pizzelles 1x
- Category: Dessert
- Method: Baking
- Cuisine: Italian
- Diet: Vegetarian
Ingredients
Batter:
- 4 large eggs, room temperature
- 1/4 cup granulated sugar
- 1/4 teaspoon fine salt
- 2 tablespoons grapeseed oil (vegetable oil can be used; melted cooled butter for crispier results)
- 1/2 teaspoon vanilla extract
- 1 cup all-purpose flour, sifted
Filling:
- 8 oz cream cheese, refrigerated
- 1/3 cup sweetened condensed milk, refrigerated
- 8 oz Cool Whip, frozen (preferably extra creamy, not original)
- 1/4 teaspoon vanilla extract
For garnish:
- 1 tablespoon powdered sugar (optional, for dusting)
Instructions
- Preheat and mix eggs: Preheat your pizzelle maker. In a medium bowl, using an electric mixer on high speed, beat 4 large eggs, 1/4 cup granulated sugar, and 1/4 teaspoon fine salt until the eggs lighten in color and the sugar fully dissolves, about 2 minutes.
- Add remaining batter ingredients: To the egg mixture, add 2 tablespoons grapeseed oil, 1/2 teaspoon vanilla extract, and 1 cup sifted all-purpose flour. Beat on low speed for about 1 minute until well combined and the flour is fully incorporated.
- Cook pizzelles: Using a 1 tablespoon measuring spoon, drop batter onto each pizzelle mold design. Close the lid and bake the pizzelles for about 18-20 seconds or until a dark golden color forms. Depending on your pizzelle maker, baking time may vary up to 60 seconds. Carefully remove the hot pizzelles with a disposable fork and quickly wrap each around a wooden stick to form a cylinder. Work swiftly before they cool and harden to avoid breakage. Place shaped pizzelles in a single layer on a baking sheet to cool and dry thoroughly; do not stack as this can cause sogginess.
- Prepare cream filling: In a clean medium bowl, beat 8 oz cream cheese on high speed for about 1 minute until smooth. Add 1/3 cup sweetened condensed milk and 1/4 teaspoon vanilla extract and beat for another minute. Then fold in 8 oz frozen Cool Whip, continuing to beat on high until the mixture is thick and smooth, about 2-3 minutes.
- Fill pizzelles: Transfer the cream filling to a piping bag. Pipe filling fully into both ends of each cooled cylinder-shaped pizzelle. For an elegant finish, dust with powdered sugar if desired.
- Chill and serve: Refrigerate the filled pizzelles until ready to serve to maintain cream firmness and enhance flavor.
Notes
- Use room temperature eggs for best batter consistency.
- Work quickly when shaping pizzelles around the stick to prevent cracking.
- Different pizzelle makers may require adjusting baking time; watch the first few carefully.
- For a crisper texture, substitute grapeseed oil with melted cooled butter.
- Store filled pizzelles refrigerated; best consumed within 2 days for optimal freshness.
- Cool Whip is used frozen to achieve a thick, creamy filling texture.
- Do not stack pizzelles during cooling to keep them crisp and maintain their shape.
Keywords: pizzelles, cream filled pizzelles, Italian dessert, waffle cookies, cream cheese filling, sweet treat, festive dessert